Hello !
A lot of tickets are about the API of CloudStack or how to control the creation, snapshots, powering up, down, reboot, destroy, mount iso, etc without using the CloudStack UI.
While the CloudStack UI is slow as it uses a lot of java, the CloudStack API is capable and well documented, even more, the project offers a CLI helper that can deal with it pretty easy, called CloudMonkey.
Using the API directly is not the scope of this HowTo, whoever can automate it with own code does not need it, this is addressed to people which are just starting to write their own scripts to deploy, check and control their VMs, as well as in part to the others, in order to get them started.
So, what is an API ?
Wikipedia: http://en.wikipedia.org/wiki/Applicatio ... _interface
In short, it is a way to connect to an application and control it. In our case, the CloudStack UI is connecting to the CloudStack master and passes commands that is harvesting and composing from the interaction with the user against some predetermined scripts.
That is one example, but we can write own panel that will do this since the API is documented, as well as simple command line scripts that can, for example, check the vm state by connecting directly to the master through a combination of keys. In addition to checking, can also do many other things, such as restart a vm, even provision them using templates and connect using the supplied password at the creation.
You do not like using the UI because is slow ? Fine, you can use the command line, will be blazing fast.
You wish to integrate deployment of VMs and connecting to them in your scripts ? Fine, you can do that through API.
Before proceeding any further, though, please be aware that someone which has access to your API keys will be able to do anything with your vms/resources. This includes destroying them, creating others that will be used for spam or other criminal activities, use more resources than you intended so increasing your bill, therefore, keep the API keys well guarded. If the UI from CloudStack or HostBill is enough for you, then dont generate API keys at all.
IWStack: API with CloudMonkey
Installing Python and CloudMonkey
First, I will use only Debian examples, for more specific examples, please look here: https://cwiki.apache.org/confluence/dis ... monkey+CLI
Now, installation is very simple:
This will install all dependencies too, so we are really ready to go.
cloudmonkey reads configuration from ~/.cloudmonkey/config which is it's config file in user's home directory/.cloudmonkey.
Further it logs in ~/.cloudmonkey/log, stores history in ~/.cloudmonkey/history and caches discovered apis in ~/.cloudmonkey/cache. Only the log and history files can be custom paths and can be configured by setting appropriate file paths in ~/.cloudmonkey/config or by command:
This is a sample configuration file, we will edit it later with the keys we get from the CloudStack UI.
Now, we need to know a few things, the host we are connecting to and the keys to connect in particular. The host is simple, it is the same we connect with the UI:
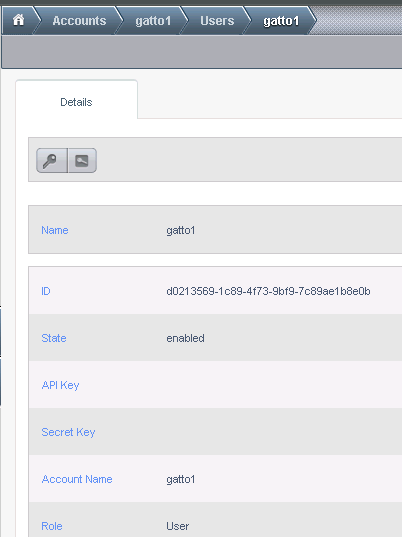
The keys we generate by going to accounts, click your username, click View Users, again your username, right under the Details title you have 2 pictures, one for changing password, the other for generating the keys:

Please notice that, by default, API connections to your account are not possible, there are no keys generated by default, you need to specifically allow it by generating the keys. If you do not intend to use the API, please do not generate the keys.
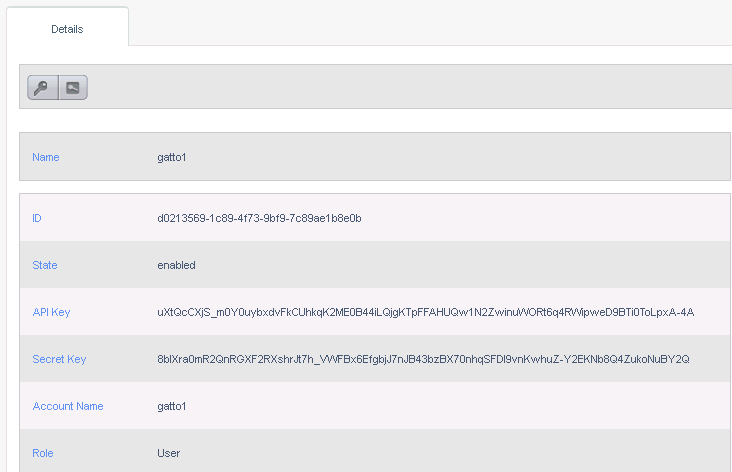
Keys are now listed:

They will remain there for when you will need them, you can also generate them as many times as you wish, so, do not imply those are my keys :P
Al that remains to do now is to set the variables in the CloudMonkey config:
Now we are really ready to go ! Next post is presenting some examples.
Now, installation is very simple:
Code: Select all
apt-get install python-pipCode: Select all
pip install cloudmonkeycloudmonkey reads configuration from ~/.cloudmonkey/config which is it's config file in user's home directory/.cloudmonkey.
Further it logs in ~/.cloudmonkey/log, stores history in ~/.cloudmonkey/history and caches discovered apis in ~/.cloudmonkey/cache. Only the log and history files can be custom paths and can be configured by setting appropriate file paths in ~/.cloudmonkey/config or by command:
Code: Select all
cloudmonkey
> set history_file /usr/share/cloudmonkey_history
> set log_file /var/log/cloudmonkeyCode: Select all
[core]
cache_file = /root/.cloudmonkey/cache
log_file = /var/log/cloudmonkey
asyncblock = true
paramcompletion = false
history_file = /usr/share/cloudmonkey_history

[ui]
color = true
prompt = >
display = default

[user]
secretkey = "enter your developer secret key" "enter your developer secret key"
apikey = "enter API key" "enter API key"

[server]
path = /client/api
host = localhost
protocol = https
port = 443
timeout = 3600
Now, we need to know a few things, the host we are connecting to and the keys to connect in particular. The host is simple, it is the same we connect with the UI:
Code: Select all
master.iwstack.com
Please notice that, by default, API connections to your account are not possible, there are no keys generated by default, you need to specifically allow it by generating the keys. If you do not intend to use the API, please do not generate the keys.
Keys are now listed:

They will remain there for when you will need them, you can also generate them as many times as you wish, so, do not imply those are my keys :P
Al that remains to do now is to set the variables in the CloudMonkey config:
Code: Select all
$ cloudmonkey
> set host master.iwstack.com
> set port 443
> set apikey <put-your-api-key-for-your-user>
> set secretkey <put-your-secret-key-for-your-user>
> set prompt CloudMonkeyCLI>Some examples
OK, now we can put CloudMonkey to do some things for us.
First, do a sync:
Now, 192 is a lot, most you will probably never need, but we will use some in some examples here.
We will try, as an example, to deploy a VM using the api only. Something like this:
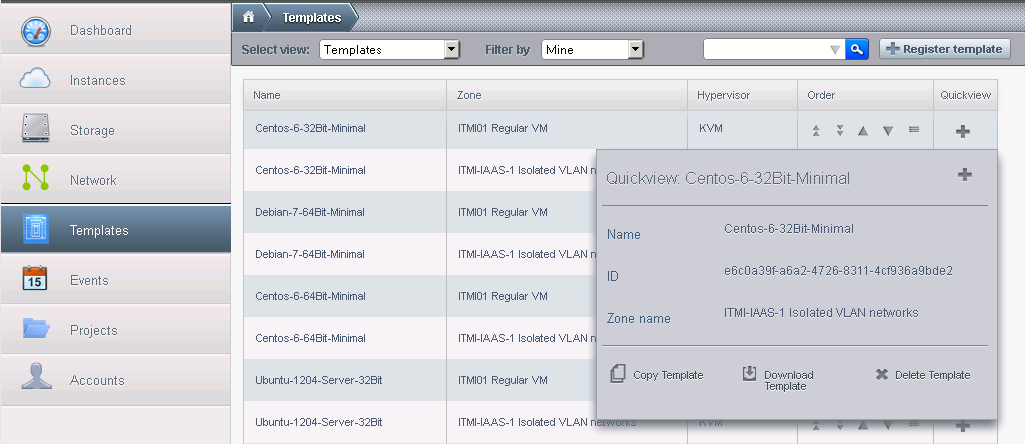
We need to know the respective ids, first, of course. We can get them from the UI:

Notice the ID in the picture: e6c0a39f-a6a2-4726-8311-4cf936a9bde2 But not all ids are available through the UI.
We can also issue the commands to cloudmonkey to list zones, for example:
Now lets see the featured templates for our zone:
Quite a few and will be much more in the end and you can also have your own, for example, lets list ours:
The output does not matter in this case as I did them so they are almost the same :P
We now need the service offerings:
There will be more of these, of course, later on.
Now we have templates IDs, offerings IDs, zone ID, all we need is network in order to deploy our first vm through the API:
So, we have everything, lets deploy a VM, say, with 1 GB ram, with debian 7 32 bit:
After awhile you see the output:
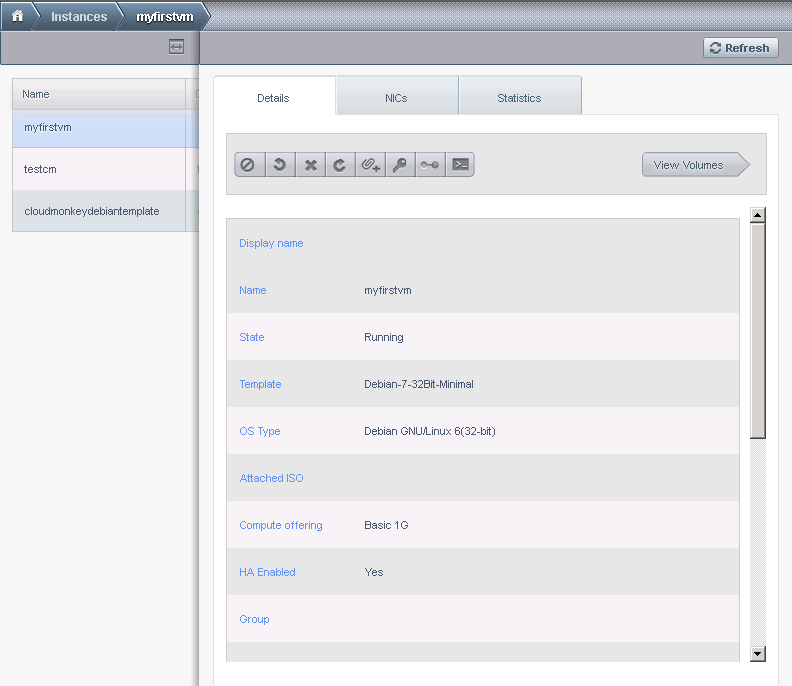
Congratulations :) You deployed the first VM using the CLI and API.

Now, that we have it, lets start and stop it:
First, do a sync:
Code: Select all
CloudMonkeyCLI> sync
192 APIs discovered and cached
We will try, as an example, to deploy a VM using the api only. Something like this:
Code: Select all
deploy virtualmachine serviceofferingid= templateid= zoneid=
Notice the ID in the picture: e6c0a39f-a6a2-4726-8311-4cf936a9bde2 But not all ids are available through the UI.
We can also issue the commands to cloudmonkey to list zones, for example:
Code: Select all
CloudMonkeyCLI> list zones
count = 1
zone:
name = ITMI-IAAS-1 Isolated VLAN networks
id = d3235ae5-2e45-41df-a77a-910c78d53f1c
allocationstate = Enabled
dhcpprovider = VirtualRouter
localstorageenabled = False
networktype = Advanced
securitygroupsenabled = False
zonetoken = 3395c4b0-6c5a-3075-a559-2cf3e605dcab
Code: Select all
CloudMonkeyCLI> list templates zoneid=d3235ae5-2e45-41df-a77a-910c78d53f1c templatefilter=featured
count = 8
template:
id = deeed761-9faa-47e0-bb17-4f1401089049
name = Ubuntu-1204-64-Desktop-KDE
account = gatto1
checksum = dd9c552ad3d1c16fffe7d4c2ef0acd34
created = 2013-07-30T09:24:05+0200
crossZones = False
displaytext = Ubuntu Precise Pangolin 64Bit full KDE desktop (Recommended 1 GB+ memory)
domain = Test1
domainid = 43d53f18-ddaf-4336-b036-4419e2c01016
format = QCOW2
hypervisor = KVM
isextractable = False
isfeatured = True
ispublic = True
isready = True
ostypeid = 63e2c78c-d9e8-11e2-8ef5-005056880000
ostypename = Ubuntu 12.04 (64-bit)
passwordenabled = True
size = 10737418240
sourcetemplateid = bb47a274-1502-4d57-a1f2-79809b844041
sshkeyenabled = False
status = Download Complete
tags:
templatetype = USER
zoneid = d3235ae5-2e45-41df-a77a-910c78d53f1c
zonename = ITMI-IAAS-1 Isolated VLAN networks
================================================================================
id = 354967d3-7d0f-4dc6-ba07-e033ea06f5ad
name = Ubuntu-1204-Server-32Bit
account = gatto1
checksum = d8778637cba70a7d64f8ad255aa03cf3
created = 2013-07-28T17:14:58+0200
crossZones = False
displaytext = Ubuntu Precise Pangolin LTS Minimal server 32 Bit
domain = Test1
domainid = 43d53f18-ddaf-4336-b036-4419e2c01016
format = QCOW2
hypervisor = KVM
isextractable = False
isfeatured = True
ispublic = True
isready = True
ostypeid = 63e2917c-d9e8-11e2-8ef5-005056880000
ostypename = Ubuntu 12.04 (32-bit)
passwordenabled = True
size = 10737418240
sshkeyenabled = False
status = Download Complete
tags:
templatetype = USER
zoneid = d3235ae5-2e45-41df-a77a-910c78d53f1c
zonename = ITMI-IAAS-1 Isolated VLAN networks
================================================================================
id = b15edf9c-e84f-4e12-b8b8-a89ebbf6f032
name = Debian-7-64Bit-Minimal
account = gatto1
checksum = 05a4a633208b0944327b367fc03f63c6
created = 2013-07-28T17:14:49+0200
crossZones = False
displaytext = Debian Wheezy 64 bit Minimal (base files, chkconfig, mc, SSH)
domain = Test1
domainid = 43d53f18-ddaf-4336-b036-4419e2c01016
format = QCOW2
hypervisor = KVM
isextractable = False
isfeatured = True
ispublic = True
isready = True
ostypeid = 63dbd9ea-d9e8-11e2-8ef5-005056880000
ostypename = Debian GNU/Linux 6(64-bit)
passwordenabled = True
size = 10737418240
sshkeyenabled = False
status = Download Complete
tags:
templatetype = USER
zoneid = d3235ae5-2e45-41df-a77a-910c78d53f1c
zonename = ITMI-IAAS-1 Isolated VLAN networks
================================================================================
id = fdf55199-46a5-4e8f-82b5-cff814abc2ee
name = Centos 6.4 32 Bit Minimal
account = johndeer
checksum = 3eb13b60704511145f0a251d997f1dfb
created = 2013-07-28T17:13:42+0200
crossZones = False
displaytext = Centos 6.4 32 Bit minimal (SSH+Chkconfig+mc)
domain = ROOT
domainid = 63b3844a-d9e8-11e2-8ef5-005056880000
format = QCOW2
hypervisor = KVM
isextractable = False
isfeatured = True
ispublic = True
isready = True
ostypeid = 63de04ea-d9e8-11e2-8ef5-005056880000
ostypename = CentOS 6.0 (32-bit)
passwordenabled = True
size = 10737418240
sshkeyenabled = False
tags:
templatetype = USER
zoneid = d3235ae5-2e45-41df-a77a-910c78d53f1c
zonename = ITMI-IAAS-1 Isolated VLAN networks
================================================================================
id = bb47a274-1502-4d57-a1f2-79809b844041
name = Ubuntu-1204-Minimal-64Bit
account = gatto1
checksum = 9d4aed823533f2be9a0649cc89d0dbf9
created = 2013-07-28T17:14:01+0200
crossZones = False
displaytext = Precise Pangolin 64 Bitminimal server (SSH+mc+chkconfig)
domain = Test1
domainid = 43d53f18-ddaf-4336-b036-4419e2c01016
format = QCOW2
hypervisor = KVM
isextractable = False
isfeatured = True
ispublic = True
isready = True
ostypeid = 63e2c78c-d9e8-11e2-8ef5-005056880000
ostypename = Ubuntu 12.04 (64-bit)
passwordenabled = True
size = 10737418240
sshkeyenabled = False
status = Download Complete
tags:
templatetype = USER
zoneid = d3235ae5-2e45-41df-a77a-910c78d53f1c
zonename = ITMI-IAAS-1 Isolated VLAN networks
================================================================================
id = a63b373f-055a-484d-b677-0cf08cf490bd
name = Centos-6-64Bit-Minimal
account = gatto1
checksum = 680c1533a539b99b70f3e778cde1c7fc
created = 2013-07-28T17:14:15+0200
crossZones = False
displaytext = CentOS 6.4 64 Bit Minimal (SSH-mc-chkconfig-wget)
domain = Test1
domainid = 43d53f18-ddaf-4336-b036-4419e2c01016
format = QCOW2
hypervisor = KVM
isextractable = False
isfeatured = True
ispublic = True
isready = True
ostypeid = 63de3c80-d9e8-11e2-8ef5-005056880000
ostypename = CentOS 6.0 (64-bit)
passwordenabled = True
size = 10737418240
sshkeyenabled = False
status = Download Complete
tags:
templatetype = USER
zoneid = d3235ae5-2e45-41df-a77a-910c78d53f1c
zonename = ITMI-IAAS-1 Isolated VLAN networks
================================================================================
id = e6c0a39f-a6a2-4726-8311-4cf936a9bde2
name = Centos-6-32Bit-Minimal
account = gatto1
checksum = a604711d7ac507f7c41afe094ec94394
created = 2013-07-28T17:14:24+0200
crossZones = False
displaytext = Centos 6.4 32 Bit minimal (SSH-mc-Base files)
domain = Test1
domainid = 43d53f18-ddaf-4336-b036-4419e2c01016
format = QCOW2
hypervisor = KVM
isextractable = False
isfeatured = True
ispublic = True
isready = True
ostypeid = 63de04ea-d9e8-11e2-8ef5-005056880000
ostypename = CentOS 6.0 (32-bit)
passwordenabled = True
size = 10737418240
sourcetemplateid = 0c75d7a4-1560-4def-bdf8-8b30a6e0bb45
sshkeyenabled = False
status = Download Complete
tags:
templatetype = USER
zoneid = d3235ae5-2e45-41df-a77a-910c78d53f1c
zonename = ITMI-IAAS-1 Isolated VLAN networks
================================================================================
id = 4c13a9a5-a39c-4df7-b90e-107fd26d1aac
name = Debian-7-32Bit-Minimal
account = johndeer
checksum = 14a92a1572ca7704f58fb6cb13f5daf1
created = 2013-07-23T00:20:04+0200
crossZones = False
displaytext = Debian Wheezy base+mc+SSH+chkconfig
domain = ROOT
domainid = 63b3844a-d9e8-11e2-8ef5-005056880000
format = QCOW2
hypervisor = KVM
isextractable = False
isfeatured = True
ispublic = True
isready = True
ostypeid = 63db9afc-d9e8-11e2-8ef5-005056880000
ostypename = Debian GNU/Linux 6(32-bit)
passwordenabled = True
size = 10737418240
sshkeyenabled = False
tags:
templatetype = USER
zoneid = d3235ae5-2e45-41df-a77a-910c78d53f1c
zonename = ITMI-IAAS-1 Isolated VLAN networks
================================================================================Code: Select all
CloudMonkeyCLI> list templates zoneid=d3235ae5-2e45-41df-a77a-910c78d53f1c templatefilter=self
We now need the service offerings:
Code: Select all
CloudMonkeyCLI> list serviceofferings
count = 3
serviceoffering:
name = Basic 512M
id = b994215c-6b67-4be4-be8f-ec08db4a9d06
cpunumber = 1
cpuspeed = 2
created = 2013-07-01T10:30:06+0200
defaultuse = False
displaytext = RAM 512M, 1 Core
issystem = False
limitcpuuse = True
memory = 512
offerha = True
storagetype = shared
================================================================================
name = Basic 1G
id = eac3ed10-f59d-4ad4-9517-9849247777ff
cpunumber = 2
cpuspeed = 2
created = 2013-07-11T16:16:49+0200
defaultuse = False
displaytext = 1GB RAM, 2 core
issystem = False
limitcpuuse = False
memory = 1024
offerha = True
storagetype = shared
================================================================================
name = Basic 2G
id = eba333be-e211-40f7-b0c5-65c61b2d5482
cpunumber = 4
cpuspeed = 2
created = 2013-07-10T19:35:17+0200
defaultuse = False
displaytext = 2GB RAM, 4 cores
issystem = False
limitcpuuse = False
memory = 2048
offerha = True
storagetype = shared
================================================================================
Now we have templates IDs, offerings IDs, zone ID, all we need is network in order to deploy our first vm through the API:
Code: Select all
CloudMonkeyCLI> list networks zoneid=d3235ae5-2e45-41df-a77a-910c78d53f1c
count = 1
network:
id = 7c8618b0-7674-425c-abeb-f5450d962794
name = Public 67 (NO Virtual Router)
acltype = Domain
broadcastdomaintype = Vlan
canusefordeploy = True
cidr = 192.165.67.0/24
displaytext = Public shared network 67 (NO Virtual Router)
dns1 = 8.8.8.8
dns2 = 4.2.2.2
domain = ROOT
domainid = 63b3844a-d9e8-11e2-8ef5-005056880000
gateway = 192.165.67.1
ispersistent = False
issystem = False
netmask = 255.255.255.0
networkdomain = cs1cloud.internal
networkofferingavailability = Optional
networkofferingdisplaytext = Offering for Shared networks
networkofferingid = d3cae496-1793-468f-a445-f6abd3a44de4
networkofferingname = DefaultSharedNetworkOffering
physicalnetworkid = 6946ec3f-9553-4d41-a4df-569111269fef
related = 7c8618b0-7674-425c-abeb-f5450d962794
restartrequired = False
service:
name = UserData
================================================================================
name = Dns
capability:
name = AllowDnsSuffixModification
canchooseservicecapability = False
value = true
================================================================================
name = Dhcp
================================================================================
specifyipranges = True
state = Setup
subdomainaccess = True
tags:
traffictype = Guest
type = Shared
zoneid = d3235ae5-2e45-41df-a77a-910c78d53f1c
zonename = ITMI-IAAS-1 Isolated VLAN networks
Code: Select all
CloudMonkeyCLI> deploy virtualmachine name=myfirstvm zoneid=d3235ae5-2e45-41df-a77a-910c78d53f1c templateid=4c13a9a5-a39c-4df7-b90e-107fd26d1aac serviceofferingid=eac3ed10-f59d-4ad4-9517-9849247777ff networkids=7c8618b0-7674-425c-abeb-f5450d962794Code: Select all
                                                accountid = ad15eba2-7077-4c2f-881f-6cf9bcdfa363
cmd = org.apache.cloudstack.api.command.user.vm.DeployVMCmd
created = 2013-08-11T06:17:39+0200
jobid = 0f9b422e-db9f-43a8-a26e-7d656e23770b
jobprocstatus = 0
jobresult:
virtualmachine:
id = c7b3a1fe-d6c0-4838-9c9c-bc00ac2b4e77
name = myfirstvm
account = gatto1
cpunumber = 2
cpuspeed = 2
created = 2013-08-11T06:17:38+0200
domain = Test1
domainid = 43d53f18-ddaf-4336-b036-4419e2c01016
guestosid = 63db9afc-d9e8-11e2-8ef5-005056880000
haenable = True
hypervisor = KVM
jobid = 0f9b422e-db9f-43a8-a26e-7d656e23770b
jobstatus = 0
memory = 1024
nic:
id = 90a75f31-ef02-4865-acf3-a401a98e7b06
broadcasturi = vlan://67
gateway = 192.165.67.1
ipaddress = 192.165.67.58
isdefault = True
isolationuri = vlan://67
macaddress = 06:64:e2:00:01:24
netmask = 255.255.255.0
networkid = 7c8618b0-7674-425c-abeb-f5450d962794
networkname = Public 67 (NO Virtual Router)
traffictype = Guest
type = Shared
password = xXxxxxxxx
passwordenabled = True
rootdeviceid = 0
rootdevicetype = ROOT
securitygroup:
serviceofferingid = eac3ed10-f59d-4ad4-9517-9849247777ff
serviceofferingname = Basic 1G
state = Running
tags:
templatedisplaytext = Debian Wheezy base+mc+SSH+chkconfig
templateid = 4c13a9a5-a39c-4df7-b90e-107fd26d1aac
templatename = Debian-7-32Bit-Minimal
zoneid = d3235ae5-2e45-41df-a77a-910c78d53f1c
zonename = ITMI-IAAS-1 Isolated VLAN networks
jobresultcode = 0
jobresulttype = object
jobstatus = 1
userid = d0213569-1c89-4f73-9bf9-7c89ae1b8e0b

Now, that we have it, lets start and stop it:
Code: Select all
CloudMonkeyCLI> stop virtualmachine id=c7b3a1fe-d6c0-4838-9c9c-bc00ac2b4e77
         accountid = ad15eba2-7077-4c2f-881f-6cf9bcdfa363
cmd = org.apache.cloudstack.api.command.user.vm.StopVMCmd
created = 2013-08-11T06:26:18+0200
jobid = 1fe69401-7ef9-49af-97a5-c1d1611bb950
jobprocstatus = 0
jobresult:
virtualmachine:
id = c7b3a1fe-d6c0-4838-9c9c-bc00ac2b4e77
name = myfirstvm
account = gatto1
cpunumber = 2
cpuspeed = 2
cpuused = 0.01%
created = 2013-08-11T06:17:38+0200
domain = Test1
domainid = 43d53f18-ddaf-4336-b036-4419e2c01016
guestosid = 63db9afc-d9e8-11e2-8ef5-005056880000
haenable = True
hypervisor = KVM
jobid = 1fe69401-7ef9-49af-97a5-c1d1611bb950
jobstatus = 0
memory = 1024
networkkbsread = 41
networkkbswrite = 0
nic:
id = 90a75f31-ef02-4865-acf3-a401a98e7b06
broadcasturi = vlan://67
gateway = 192.165.67.1
ipaddress = 192.165.67.58
isdefault = True
isolationuri = vlan://67
macaddress = 06:64:e2:00:01:24
netmask = 255.255.255.0
networkid = 7c8618b0-7674-425c-abeb-f5450d962794
networkname = Public 67 (NO Virtual Router)
traffictype = Guest
type = Shared
passwordenabled = True
rootdeviceid = 0
rootdevicetype = ROOT
securitygroup:
serviceofferingid = eac3ed10-f59d-4ad4-9517-9849247777ff
serviceofferingname = Basic 1G
state = Stopped
tags:
templatedisplaytext = Debian Wheezy base+mc+SSH+chkconfig
templateid = 4c13a9a5-a39c-4df7-b90e-107fd26d1aac
templatename = Debian-7-32Bit-Minimal
zoneid = d3235ae5-2e45-41df-a77a-910c78d53f1c
zonename = ITMI-IAAS-1 Isolated VLAN networks
jobresultcode = 0
jobresulttype = object
jobstatus = 1
userid = d0213569-1c89-4f73-9bf9-7c89ae1b8e0b
Code: Select all
CloudMonkeyCLI> start virtualmachine id=c7b3a1fe-d6c0-4838-9c9c-bc00ac2b4e77
       accountid = ad15eba2-7077-4c2f-881f-6cf9bcdfa363
cmd = org.apache.cloudstack.api.command.user.vm.StartVMCmd
created = 2013-08-11T06:26:57+0200
jobid = 12e8f5da-b488-4071-b32f-b08cf52d6e8c
jobprocstatus = 0
jobresult:
virtualmachine:
id = c7b3a1fe-d6c0-4838-9c9c-bc00ac2b4e77
name = myfirstvm
account = gatto1
cpunumber = 2
cpuspeed = 2
cpuused = 0.01%
created = 2013-08-11T06:17:38+0200
domain = Test1
domainid = 43d53f18-ddaf-4336-b036-4419e2c01016
guestosid = 63db9afc-d9e8-11e2-8ef5-005056880000
haenable = True
hypervisor = KVM
jobid = 12e8f5da-b488-4071-b32f-b08cf52d6e8c
jobstatus = 0
memory = 1024
networkkbsread = 41
networkkbswrite = 0
nic:
id = 90a75f31-ef02-4865-acf3-a401a98e7b06
broadcasturi = vlan://67
gateway = 192.165.67.1
ipaddress = 192.165.67.58
isdefault = True
isolationuri = vlan://67
macaddress = 06:64:e2:00:01:24
netmask = 255.255.255.0
networkid = 7c8618b0-7674-425c-abeb-f5450d962794
networkname = Public 67 (NO Virtual Router)
traffictype = Guest
type = Shared
passwordenabled = True
rootdeviceid = 0
rootdevicetype = ROOT
securitygroup:
serviceofferingid = eac3ed10-f59d-4ad4-9517-9849247777ff
serviceofferingname = Basic 1G
state = Running
tags:
templatedisplaytext = Debian Wheezy base+mc+SSH+chkconfig
templateid = 4c13a9a5-a39c-4df7-b90e-107fd26d1aac
templatename = Debian-7-32Bit-Minimal
zoneid = d3235ae5-2e45-41df-a77a-910c78d53f1c
zonename = ITMI-IAAS-1 Isolated VLAN networks
jobresultcode = 0
jobresulttype = object
jobstatus = 1
userid = d0213569-1c89-4f73-9bf9-7c89ae1b8e0b
Conclusion: API with CloudMonkey
As you can see, we can use cloudmonkey to pull the APIs and issue commands. Cloudmonkey can also be invoked in scripts like this:
If you do not wish to use cloudmonkey, you can, of course, issue own calls to the api. That is documented in the CloudStack documentation, the goal of this tutorial was to get you going on a fast track. Since cloudmonkey is small and easy to set up in a few lines while also available in scripts, it is, perhaps, easier to use it than to issue the API calls directly, however, advanced programmers and automation artists will prefer their own tools to anything else.
http://cloudstack.apache.org/docs/api/a ... _User.html
Happy coding !
Code: Select all
root@deb7-32Bit:~# cloudmonkey list zones
count = 1
zone:
name = ITMI-IAAS-1 Isolated VLAN networks
id = d3235ae5-2e45-41df-a77a-910c78d53f1c
allocationstate = Enabled
dhcpprovider = VirtualRouter
localstorageenabled = False
networktype = Advanced
securitygroupsenabled = False
zonetoken = 3395c4b0-6c5a-3075-a559-2cf3e605dcab
http://cloudstack.apache.org/docs/api/a ... _User.html
Happy coding !
Who is online
Users browsing this forum: No registered users and 18 guests
